Wednesday, June 18, 2025

BIG FISH BIRTHDAY

BIG FISH BIRTHDAY

Products used:  Northwoods Rubber Stamps bass stamp, Honey bee Stamps Rod and Reel die set, Honey bee stamps hooked on you stamp and die set. Copic markers b41, yg91, yr61 and Altenew alcohol markers c016, g935, g554, y025, y234,b802, c024.
To make the card stamp the bass in black ink on white cardstock. Color the bass in greens and the water in blues.  Die cut the tackle box in light blue and olive cardstock. Stamp birthday wishes in black ink and die cut out. Cut out the background paper 3 and 13/16 by 5 inches in green, blue and brown plaid.  Adhere the background to the card.  Attach the fish to the right side of the card.  Next attach the toolbox to the bottom of the card to the left. Lastly, attach the birthday wishes with foam dots part on the fish and the background. Have fun!


Wednesday, June 11, 2025

BBQ BIRTHDAY


 BBQ BIRTHDAY

Dies needed for this project: Trinity Stamps backyard BBQ die set and Creative expressions stacked happy birthday die.  Paper needed: Tonic studios- scarlet organza, starlit Sky, black velvet, glossy black,and marina mist. Altenew brushed gold cardstock.  Concord and 9th poppy cardstock. 
Die cut all the parts of the grill.  Die cut the happy birthday out of gold cardstock.  Now time for the background paper, I chose something masculine to complement the grill .  Lets assemble the card.  Adhere the grill to background paper then adhere the happy birthday to the bottom of the grill. 

Wednesday, May 21, 2025

ON THE FARM BIRTHDAY

ON THE FARM BIRTHDAY


 Dies needed for this project: Honeybee lovely layers On the Farm die set and Picket Fence Studios happy birthday die.  Background paper Stampin up.

Die cut the On the farm Tractor, silo, windmill, barn, fence, haystack etc. and the happy birthday. Adhere to background paper and you are done.

Wednesday, May 14, 2025

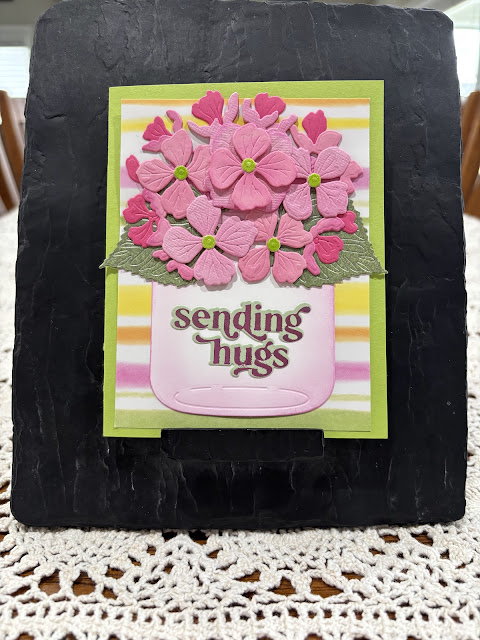
SENDING HUGS PINK HYDRANGEAS IN MASON JAR

SENDING HUGS PINK HYDRANGEAS IN MASON JAR

Products used:  Honeybee Stamps Mason Jar die set, Hydrangea die set.  Pink Fresh perfect sentiments die and hot foil set.
To make this card cut the background paper to 3 and 14/16 inch by 5 inch.  Die cut all the hydrangea starting with the darkest paper first then get lighter. The flower centers are lime green sparkle paper.  I die cut the leaves out of green patterned background paper.  I die cut the mason jar out of a light pink and ink blended around the edges in a medium pink.  I did a little ink blending on the flower pieces as I was putting them together.  Follow the Honeybee guide to glue all of the flower pieces together. I put the sentiment on light green cardstock with a pink foil and used the glimmer machine and die cut it out. Putting the card together I put the Happy Birthday die cut at the bottom of the jar and arranged the flowers all glued together centered on the jar top and the top of the card.
ENJOY!


Tuesday, May 6, 2025

GREEN AND NAVY PLAID TOOLBOX


GREEN AND NAVY PLAID TOOLBOX

Products used : Trinity Stamps - Toolbox gift card holder die set.

To make this card cut the green and navy plaid background paper to 3 and 13/16 by 5, then cut a navy card front 4.25 x 5.5 and set aside.  Die cut the toolbox out of green tool background paper and the drawers and tools out of green and glossy silver  cardstock. Die cut the wheels out of glossy black and glossy silver cardstock. Adhere the background paper and navy paper to the card front.  Assemble the tools and toolbox and attach to middle of background paper and you are finished.

Wednesday, April 30, 2025

FLORAL LAVENDER HUMMINGBIRD


 FLORAL LAVENDER HUMMINGBIRD

Products used : Honey bee stamps - hummingbird,  Creative Expressions happy birthday, and Altenew inks- emerald, shadow creek, grass field, amber blaze, wisteria and raspberry sunset.

To make this card cut the floral background paper to 3.5 x 5.5 inches.  Die cut the hummingbird out of white cardstock.  Next, ink blend all the parts.  I started with Emerald for the back layer then wisteria for the body. For the head and tail grass field. Next blend the throat with the raspberry sunset and the beak with the amber blaze.  Shadow creek on edge of top wing.  Put the pieces together according to the Honey bee layering guide on the honey bee website.  For the eye I used an alcohol black marker.  Die cut the happy birthday out of white glitter paper. Adhere the background paper to the middle of the card front. Next attach the hummingbird to the left of card front.  Next attach the Happy birthday in the middle of the card front. Lastly, I put some pink sparkle washi tape along the top and bottom and you are done.

Wednesday, April 23, 2025

HAPPY DAY AT THE BEACH


             HAPPY DAY AT THE BEACH

Products used:  Stampin Up Summer by the sea stamp set, Waffle Flower Papercut Party banner die cuts, Altenew Beach bucket stamp & die set, copic markers in light blues, reds and tans. 
To make the card stamp the boy on white cardstock in black ink. Stamp the bucket on red cardstock in black ink. Die cut the bucket. Color the inside of the bucket with copper stickles.  Color the boy in the blues, reds and tans. Die cut the happy birthday out of white cardstock.  I picked a rainbow background paper. To assemble adhere the background paper then the boy in lower bottom of the card.  Lastly, adhere the bucket centered above the boy and attach the happy birthday over the bucket and you are done. 

Wednesday, April 16, 2025

HEDGEHOG BIRTHDAY


                   HEDGEHOG BIRTHDAY

Products used:  Stampin Up Animal Valentines stamp set, Stampin Up scalloped contour die set, Waffle Flower paper cut party banners die set, Honey Bee metallic mix pearl stickers.
To make this card stamp hedgehog on white cardstock and color with copic markers browns and tans and pinks. Die cut the happy birthday out of close to cocoa or brown cardstock.  Die cut the frame out of background paper in yellow and tan with the scalloped contour die set .  Cut the layered  background paper cut to 3 and 13/16th inch by 5 inch. Cut the card base 5 and 1/2 inches by 8 and 1/2 inchs with a score line at 4 and 1/4 inches on the 8 and 1/2.  Now we are ready to assemble the card adhere the background paper cut to 3 and 13/16th by 5 to the folded cardstock base.  Next adhere the cut frame to the background paper. After that adhere the hedgehog to the right side of the frame then attach the happy birthday like he is holding the sign across the frame.  Lastly embellish with gold stickers. 

Tuesday, April 15, 2025

CABIN AT THE LAKE BLUE HAPPY BIRTHDAY


 CABIN AT THE LAKE BLUE HAPPY BIRTHDAY

Dies needed for this project: Honey bee stamps - lakeside scene builder die set and summer cabins. Paper Rose  happy birthday die.  At the lake stencil set.  Inks used:  Tim Holtz Distress - Rustic wilderness, forest moss, tumbled glass, evergreen bough, mowed lawn and gathered twigs. Altenew crisp dye ink- sapphire, cloudy night and silver lake, Fresh dye inks- galactic stream. Stickles waterfall.

To make the card die cut the lakeside scene builder out of 4.25 x 5.5 inch white cardstock. Now start with the stencils and ink blend the following colors, for the sky i used galactic stream and tumbled glass. For the lake I used sapphire. For the mountains cloudy lake and silver lake.  Lastly for the trees and grass I used rustic wilderness, forest moss, evergreen bough and mowed lawn and gathered twigs for the tree bases.  I die cut the cabin out of colored cardstock and put it together. I also put yellow glitter paper behind the windows.  Die cut the canoe out of a brown cardstock.  Die cut the happy birthday out of blue paper.  Now adhere the ink blended background to the front of the card.  Next i put the stickles waterfall over the water in the lake and let dry.  After the lake is dry attach the canoe to the middle of the lake.  Attach the cabin to the left side of the card in front of the trees with foam tape.  Attach the Happy Birthday die over the mountains. You are done.

Wednesday, April 9, 2025

LACE SILVER LOVE WEDDING


            LACE SILVER LOVE WEDDING

Products used : Stampin Up love stamp set, leaves background paper, Honeybee Stamps Spring vine layering frames die set. Trinity Stamps Happily ever after stamp set.  Versamark watermark stamp pad. Ranger silver superfine embossing powder.
To make this card diecut the silver leaves background paper with the spring vines layering frames die set.  Stamp the white cardstock with versamark and use the Range silver superfine embossing powder and emboss the love stamp. Layer behind the spring vines silver leaves paper with silver glitter paper.  Adhere together and you are done.

Tuesday, March 11, 2025

BLUEBIRD BIRCH BIRTHDAY

BLUEBIRD BIRCH BIRTHDAY

Dies needed for this project: Honeybee lovely layers spring birds and Honeybee A2 birch tree cover plate base and top and Waffle Flower papercut party banner.  Inks needed oranges and yellows. Copic markers in cool gray markers.
Die cut the spring birds and follow the layering guide on Honey bee website. Cut both birch tree cover panels out of white cardstock shade the shadows with copic cool grey.  Die cut the happy birthday out of blue cardstock.  Now time for the background color, heavier on top and sides lighter in the middle .  Lets assemble the card.  Adhere the first panel to background then adhere the top panel. Now attach the bluebird in the middle of the card and attach the happy birthday below the bird.

Tuesday, March 4, 2025

FLOWER BIRD HOUSE


FLOWER BIRD HOUSE

Products used: Honey bee Stamps - birdhouse A2 card base dies, Heffy Doodle Happy Birthday die.  To make the card die cut all the pieces and put together.  To make the shape card use a top folding card move the die just above the fold and die cut it out and adhere it together. Enjoy!


Wednesday, February 19, 2025

WINTER DEER


WINTER DEER
Very peaceful card for January.  
Dies needed for this project: Honeybee lovely layers deer and Honeybee A2 birch tree cover plate base and top.  Inks needed pool, aqua, lavender and browns. Copic cool gray markers.
Die cut the deer and follow the layering guide on Honey bee website. Cut both birch tree cover panels out of white cardstock shade the shadows with copic cool grey.  I free formed the snow drifts and applied lavendar ink blending to tops of drifts and overlapped.  I did a little shading to the deer with leftover browns on my blending brush.  Now time for the background color, heavier on top and sides lighter in the middle .  Lets assemble the card.  Adhere the first panel to background then one of the snow drifts then the first deer next adhere the top panel , another snow drift and the buck.